The default setting of Facebook is “Public” which means that all your information can be seen by anyone who visits your Facebook profile. But what if you want to keep your Facebook profile private so you can have more control over your profile and set whether they see your profiles, who aren’t your friends? How is it possible to change your account’s default settings on Facebook? Congratulations, you are landing on the right article; keep reading it, as we will walk you through the entire steps as to how you can make your Facebook private.
How do I make my Facebook private?
If you want to make your Facebook profile private, follow the below steps and you will understand how to make your Facebook private from your Computer.
Step 1: Open a web browser and log in to your Facebook account. To log in, you need to enter either your email address or phone number along with your password.

Step 2: Go to the arrow icon on the top right of the screen and click on “Settings & Privacy” and then click “Settings” again.


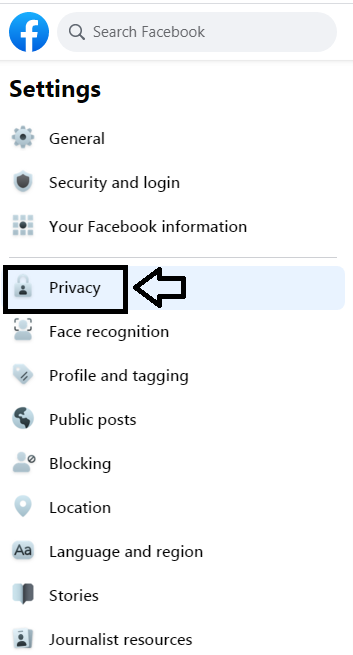
Step 3: Now go to the menu on the left side of the screen and select “Privacy”.

Step 4: Once you click on “Privacy”, you arrive at “Privacy settings and Tools”, from here you can change and control your Facebook profile and make it private according to your need.
Step 5: You can click on “Manage your profile” under the “Privacy shortcuts” section and control who can see your date of birth or relationship status.

Step 6: Under the “Your Activity” section, you can control who can see your future posts, and who can the people, Pages, and lists you follow?

You can adjust the settings that suit you the most. To do this, just click on the blue “Edit” button next to the specific feature and then click on “Public”, the below options will open from which you can select with whom you want to give access or share the specific information.

- If you select Public, anyone on or off Facebook can see it
- If you select Friends, only your Facebook friends can see it
- If you select Friends except…, you can have an option not to show to some of your friends
- If you select Specific friends, you can select one or more friends with whom you want to share the information
- If you select Only me, then only you can see the information
- If you select Custom, then you can include or exclude any of your friends, and lists to customize the sharing options
Step 7: You can also control how people can find and contact you on Facebook under “How people can find and contact you”, including “Who can send you friend requests”, “Who can see your friends list”, “Who can look you up using the email address you provided”, “Who can look you up using the phone number you provided”, and “Do you want search engines outside Facebook to link to your profile?”

Step 8: Also, you can control “How to get message requests” which covers messages you get from “Friends of friends on Facebook”, “Accounts you follow or have chatted to on Instagram”, “Your followers on Instagram”, “Others on Facebook”, and “Others on Instagram”.

How to Make Your Profile Picture Private on Facebook?
You will agree with me that whenever any Facebook user checks out your profile, the very first thing they see is your profile picture. So, it is recommended to control who can see your profile picture.
To do that, you need to follow the below steps:
Step 1: Log in to your Facebook account, and click on your profile photo on the top right of the screen.

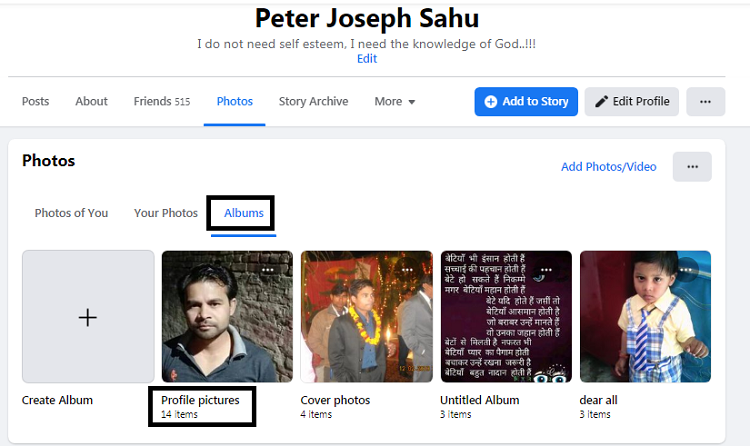
Step 2: Now, click on the “Photos” tab, just below your profile photo.

Step 3: Go to the “Albums” tab and then click on “Profile pictures”.

Step 4: Select your current profile picture and then click on three vertical dots on the top right of the profile picture and select “Edit Audience”.

Step 5: A pop-up appears in the middle of the screen, you can select your audience from Public, Friends, Friends except, Specific friends, Only me, and Custom.

How to make Your Cover Photo private on Facebook?
You can also make your cover photo private on Facebook, to do that, follow these below steps:
Step 1: Log in to your Facebook account, and click on your profile photo on the top right of the screen.

Step 2: Now, click on the “Photos” tab, just below your profile photo.

Step 3: Go to the “Albums” tab and then click on “Cover photos”.

Step 4: Select your current cover photo and then click on three vertical dots on the top right of the profile picture and select “Edit Audience”.

Step 5: A pop-up appears in the middle of the screen, you can select your audience from Public, Friends, Friends except, Specific friends, Only me, and Custom.

Leave a Reply