Custom Contact Form for Blogger
This tutorial is about how to add a custom contact form for Blogger, follow the steps as mentioned in the article and you will be able to create a “Contact Us” Page in Blogger (Blogspot) comfortably.

Advantages for Contact Form
With the help of the Contact form, you will be able to receive the message straight away.
Visitors can also be able to contact you easily, as they find the contact form on the blog.
Do follow the article now, step by step, and you can add a custom contact form for bloggers, on your own within just 10-15 minutes. So, let us dive into it.
Step 1: Log in to Blogger.com, go to Navigation and click “Layout”.

Step 2: Go to the Sidebar section, and click “Add a Gadget”.

Step 3: Scroll the page down, and you will find an option with “Contact Form”, click on the “+” sign.

Step 4: As soon as you click on the “+” sign, your contact page will open. You may change the title of the form, if needed and save it.

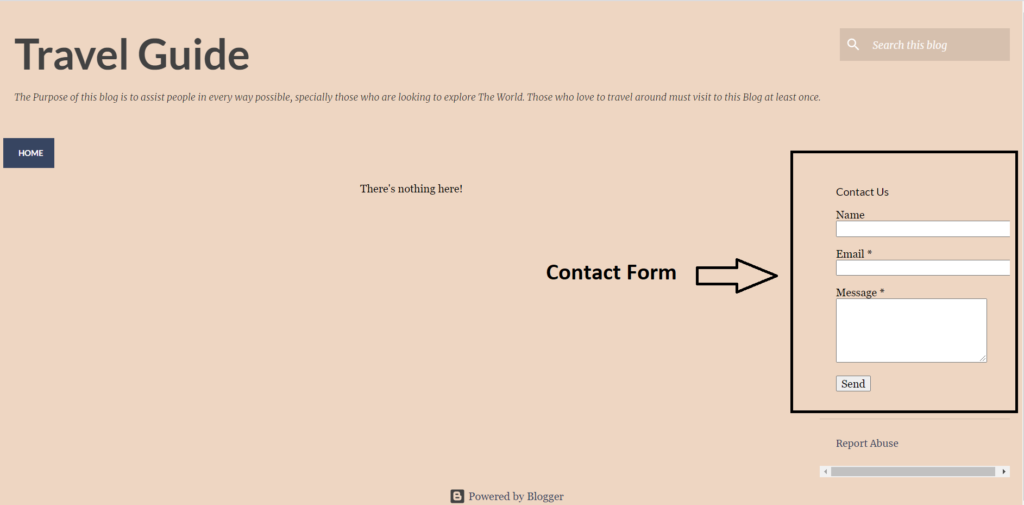
Step 5: Now, you will see the contact gadget on the sidebar of the blog. So, to hide it, follow these further steps.
Step 6: Again, go to the Navigation page, and select “Theme” this time, and click on “Customise”.

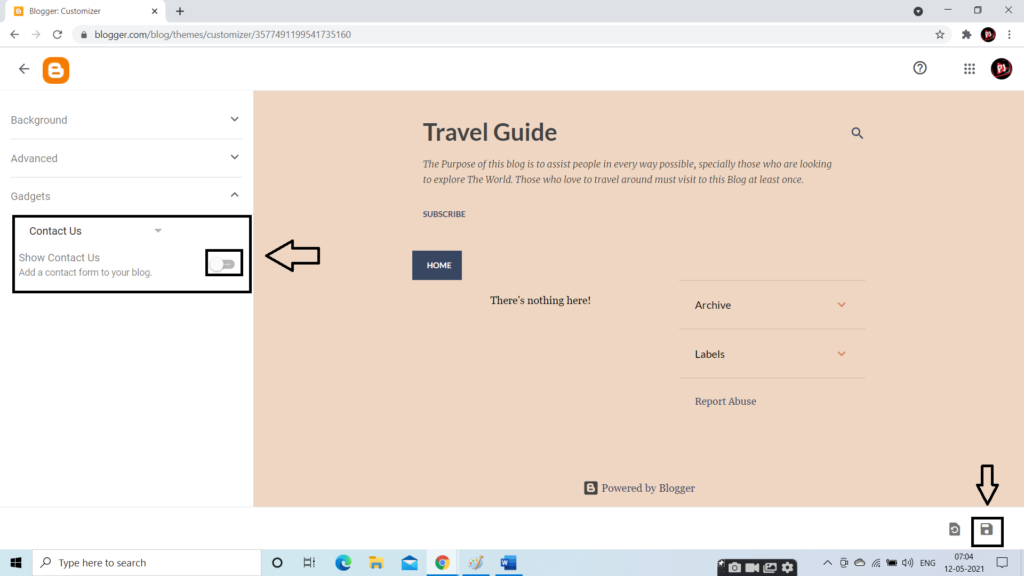
Step 7: Click on “Advanced”, and then “Gadgets” followed by “Contact Us”.

Step 8: Hide the “Contact Us” form by off the toggle button, as shown in the below image.
Step 9: Now, go to “+ New Page”.

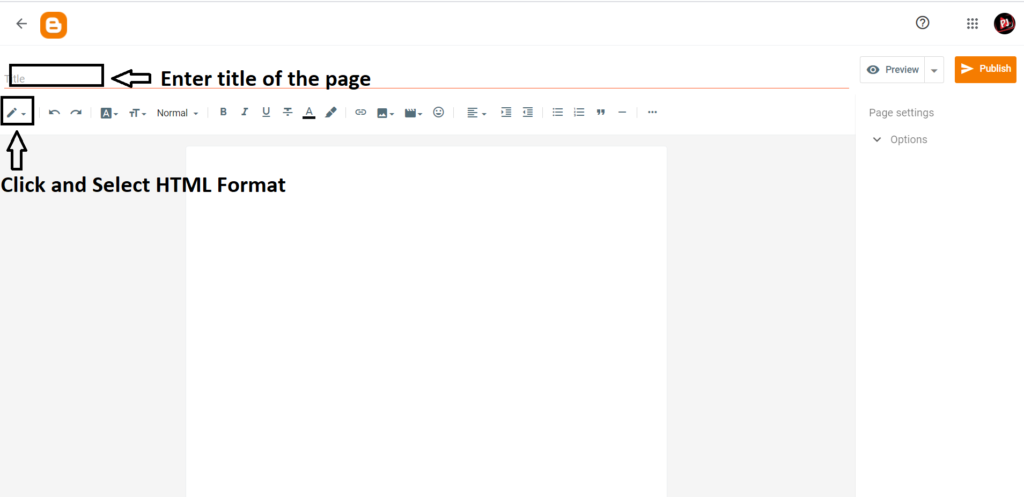
Step 10: Enter the Title of the page, and select the HTML format, by click on the pencil sign. The below image is for your reference.
Step 11: Remove whatever mention on the HTML page, and copy the below HTML code.

<div id=”custom_ContactForm1″ class=”widget ContactForm”>
<div class=”contact-form-widget”>
<p>Contact Us by filling out this form.</p>
<div class=”form”>
<form name=”contact-form”>
<p></p>
Name
<br>
<input type=”text” value=”” size=”30″ name=”name” id=”ContactForm1_contact-form-name” class=”contact-form-name”>
<p></p>
<span style=”font-weight: bolder;”>*</span>
<br>
<input type=”text” value=”” size=”30″ name=”email” id=”ContactForm1_contact-form-email” class=”contact-form-email”>
<p></p>
Message
<span style=”font-weight: bolder;”>*</span>
<br>
<textarea rows=”5″ name=”email-message” id=”ContactForm1_contact-form-email-message” cols=”25″ class=”contact-form-email-message”></textarea>
<p></p>
<input type=”button” value=”Send” id=”ContactForm1_contact-form-submit” class=”contact-form-button contact-form-button-submit”>
<p></p>
<div style=”text-align: center; max-width: 222px; width: 100%”>
<p id=”ContactForm1_contact-form-error-message” class=”contact-form-error-message”></p>
<p id=”ContactForm1_contact-form-success-message” class=”contact-form-success-message”></p>
</div>
</form>
</div>
</div>
<div class=”clear”></div>
<span class=”widget-item-control”>
<span class=”item-control blog-admin”>
<a title=”Edit” target=”configContactForm1″ onclick=”return _WidgetManager._PopupConfig(document.getElementById(“ContactForm1″));” href=”//www.blogger.com/rearrange?blogID=8799058979810298021&widgetType=ContactForm&widgetId=ContactForm1&action=editWidget§ionId=sidebar-right-1″ class=”quickedit”>
<img width=”18″ height=”18″ src=”//img1.blogblog.com/img/icon18_wrench_allbkg.png” alt=””>
</a>
</span>
</span>
<div class=”clear”></div>
</div>
Step 12: Done! Your contact page is complete, have a look at it!


